无数据库的Spring Boot CRUD示例
在本教程中,我们将学习如何使用Spring引导构建CRUD REST API,但不使用数据库。
基本上,我们在内存对象中存储和检索数据。
请注意,我们将使用最新版本的Spring Boot,即Spring Boot3。
1.创建Spring Boot应用程序
创建SpringBoot应用程序的方法有很多。您可以参考以下文章来创建SpringBoot应用程序。
使用Spring Initializer创建Spring Boot项目
在Spring Tool Suite[STS]中创建Spring Boot项目
请参阅下一步以创建项目打包结构。
2.创建项目打包结构
以下是供您参考的项目包装结构:

3.Maven依赖项
以下是供您参考的pom.xml文件:
<?xml version="1.0" encoding="UTF-8"?>
<project xmlns="http://maven.apache.org/POM/4.0.0" xmlns:xsi="http://www.w3.org/2001/XMLSchema-instance"
	xsi:schemaLocation="http://maven.apache.org/POM/4.0.0 https://maven.apache.org/xsd/maven-4.0.0.xsd">
	<modelVersion>4.0.0</modelVersion>
	<parent>
		<groupId>org.springframework.boot</groupId>
		<artifactId>spring-boot-starter-parent</artifactId>
		<version>3.0.0-SNAPSHOT</version>
		<relativePath/> <!-- lookup parent from repository -->
	</parent>
	<groupId>net.javaguides</groupId>
	<artifactId>springboot-crud-example-without-database</artifactId>
	<version>0.0.1-SNAPSHOT</version>
	<name>springboot-crud-example-without-database</name>
	<description>Demo project for Spring Boot</description>
	<properties>
		<java.version>17</java.version>
	</properties>
	<dependencies>
		<dependency>
			<groupId>org.springframework.boot</groupId>
			<artifactId>spring-boot-starter-web</artifactId>
		</dependency>

		<dependency>
			<groupId>org.projectlombok</groupId>
			<artifactId>lombok</artifactId>
			<optional>true</optional>
		</dependency>
		<dependency>
			<groupId>org.springframework.boot</groupId>
			<artifactId>spring-boot-starter-test</artifactId>
			<scope>test</scope>
		</dependency>
	</dependencies>

	<build>
		<plugins>
			<plugin>
				<groupId>org.springframework.boot</groupId>
				<artifactId>spring-boot-maven-plugin</artifactId>
				<configuration>
					<excludes>
						<exclude>
							<groupId>org.projectlombok</groupId>
							<artifactId>lombok</artifactId>
						</exclude>
					</excludes>
				</configuration>
			</plugin>
		</plugins>
	</build>
	<repositories>
		<repository>
			<id>spring-milestones</id>
			<name>Spring Milestones</name>
			<url>https://repo.spring.io/milestone</url>
			<snapshots>
				<enabled>false</enabled>
			</snapshots>
		</repository>
		<repository>
			<id>spring-snapshots</id>
			<name>Spring Snapshots</name>
			<url>https://repo.spring.io/snapshot</url>
			<releases>
				<enabled>false</enabled>
			</releases>
		</repository>
	</repositories>
	<pluginRepositories>
		<pluginRepository>
			<id>spring-milestones</id>
			<name>Spring Milestones</name>
			<url>https://repo.spring.io/milestone</url>
			<snapshots>
				<enabled>false</enabled>
			</snapshots>
		</pluginRepository>
		<pluginRepository>
			<id>spring-snapshots</id>
			<name>Spring Snapshots</name>
			<url>https://repo.spring.io/snapshot</url>
			<releases>
				<enabled>false</enabled>
			</releases>
		</pluginRepository>
	</pluginRepositories>

</project>
4.创建模型-Product.java
让我们创建一个Product模型类,并向其添加以下内容:
package net.javaguides.springboot.model;

import lombok.AllArgsConstructor;
import lombok.Data;
import lombok.NoArgsConstructor;

@Data
@AllArgsConstructor
@NoArgsConstructor
public class Product {
    private int id;
    private String name;
    private int quantity;
    private double price;
}
5.创建存储库-ProductRepository
我们将使用ArrayList对象在内存中执行CRUD操作。
创建ProductRepository并将以下内容添加到其中:
package net.javaguides.springboot.repository;

import net.javaguides.springboot.model.Product;
import org.springframework.stereotype.Repository;

import java.util.ArrayList;
import java.util.List;
import java.util.stream.Collectors;

@Repository
public class ProductRepository {
    private List<Product> list = new ArrayList<Product>();

    public void createProducts() {
        list = List.of(
                new Product(1, "product 1", 10, 1000),
                new Product(2, "product 2", 20, 2000),
                new Product(3, "product 3", 30, 3000)
        );
    }

    public List<Product> getAllProducts() {
        return list;
    }

    public Product findById(int id){
        for (int i = 0; i < list.size(); i++) {
            if (list.get(i).getId() == (id)) {
                return list.get(i);
            }
        }
        return null;
    }

    public List<Product> search(String name) {
        return list.stream().filter(x -> x.getName().startsWith(name)).collect(Collectors.toList());
    }

    public Product save(Product p) {
        Product product = new Product();
        product.setId(p.getId());
        product.setName(p.getName());
        product.setQuantity(p.getQuantity());
        product.setPrice(p.getPrice());
        list.add(product);
        return product;
    }

    public String delete(Integer id) {
        list.removeIf(x -> x.getId() == (id));
        return null;
    }

    public Product update(Product product) {
        int idx = 0;
        int id = 0;
        for (int i = 0; i < list.size(); i++) {
            if (list.get(i).getId() == (product.getId())) {
                id = product.getId();
                idx = i;
                break;
            }
        }

        Product product1 = new Product();
        product1.setId(id);
        product1.setName(product.getName());
        product1.setQuantity(product.getQuantity());
        product1.setPrice(product.getPrice());
        list.set(idx, product);
        return product1;
    }
}
6.创建服务-ProductService.java
创建ProductService类,并向其中添加以下内容:
package net.javaguides.springboot.service;

import net.javaguides.springboot.model.Product;
import net.javaguides.springboot.repository.ProductRepository;
import org.springframework.beans.factory.annotation.Autowired;
import org.springframework.stereotype.Service;

import java.util.List;

@Service
public class ProductService {
    @Autowired
    private ProductRepository repository;

    public Product saveProduct(Product product) {
        return repository.save(product);
    }

    public List<Product> getProducts() {
        return repository.getAllProducts();
    }

    public Product getProductById(int id) {
        return repository.findById(id);
    }

    public String deleteProduct(int id) {
        repository.delete(id);
        return "product removed !! " + id;
    }

    public Product updateProduct(Product product) {
       return repository.update(product);
    }
}
7.创建控制器-ProductController.java
让我们创建用于创建、检索、更新和删除产品资源的REST API。
让我们创建ProductController类,并向其中添加以下内容:
package net.javaguides.springboot.controller;

import net.javaguides.springboot.model.Product;
import net.javaguides.springboot.service.ProductService;
import org.springframework.beans.factory.annotation.Autowired;
import org.springframework.web.bind.annotation.*;

import java.util.List;

@RestController
@RequestMapping("/api/v1/products")
public class ProductController {

    @Autowired
    private ProductService service;

    @PostMapping
    public Product addProduct(@RequestBody Product product) {
        return service.saveProduct(product);
    }

    @GetMapping
    public List<Product> findAllProducts() {
        return service.getProducts();
    }

    @GetMapping("{id}")
    public Product findProductById(@PathVariable int id) {
        return service.getProductById(id);
    }

    @PutMapping
    public Product updateProduct(@RequestBody Product product) {
        return service.updateProduct(product);
    }

    @DeleteMapping("{id}")
    public String deleteProduct(@PathVariable int id) {
        return service.deleteProduct(id);
    }
}
8.运行Spring Boot应用程序
我们已经成功开发了产品模型的所有CRUD Rest API。现在是在servlet容器(嵌入式tomcat)中部署应用程序的时候了
我们可以通过两种方式启动独立的Spring引导应用程序
1.从应用程序的根目录,键入以下命令来运行它-
$ mvn spring-boot:run2.从IDE中,将SpringbootCrudExampleWithoutDatabaseApplication.main()方法作为独立Java类运行,该类将在端口8080上启动嵌入式Tomcat服务器,并将浏览器指向http://localhost:8080/。
9.演示
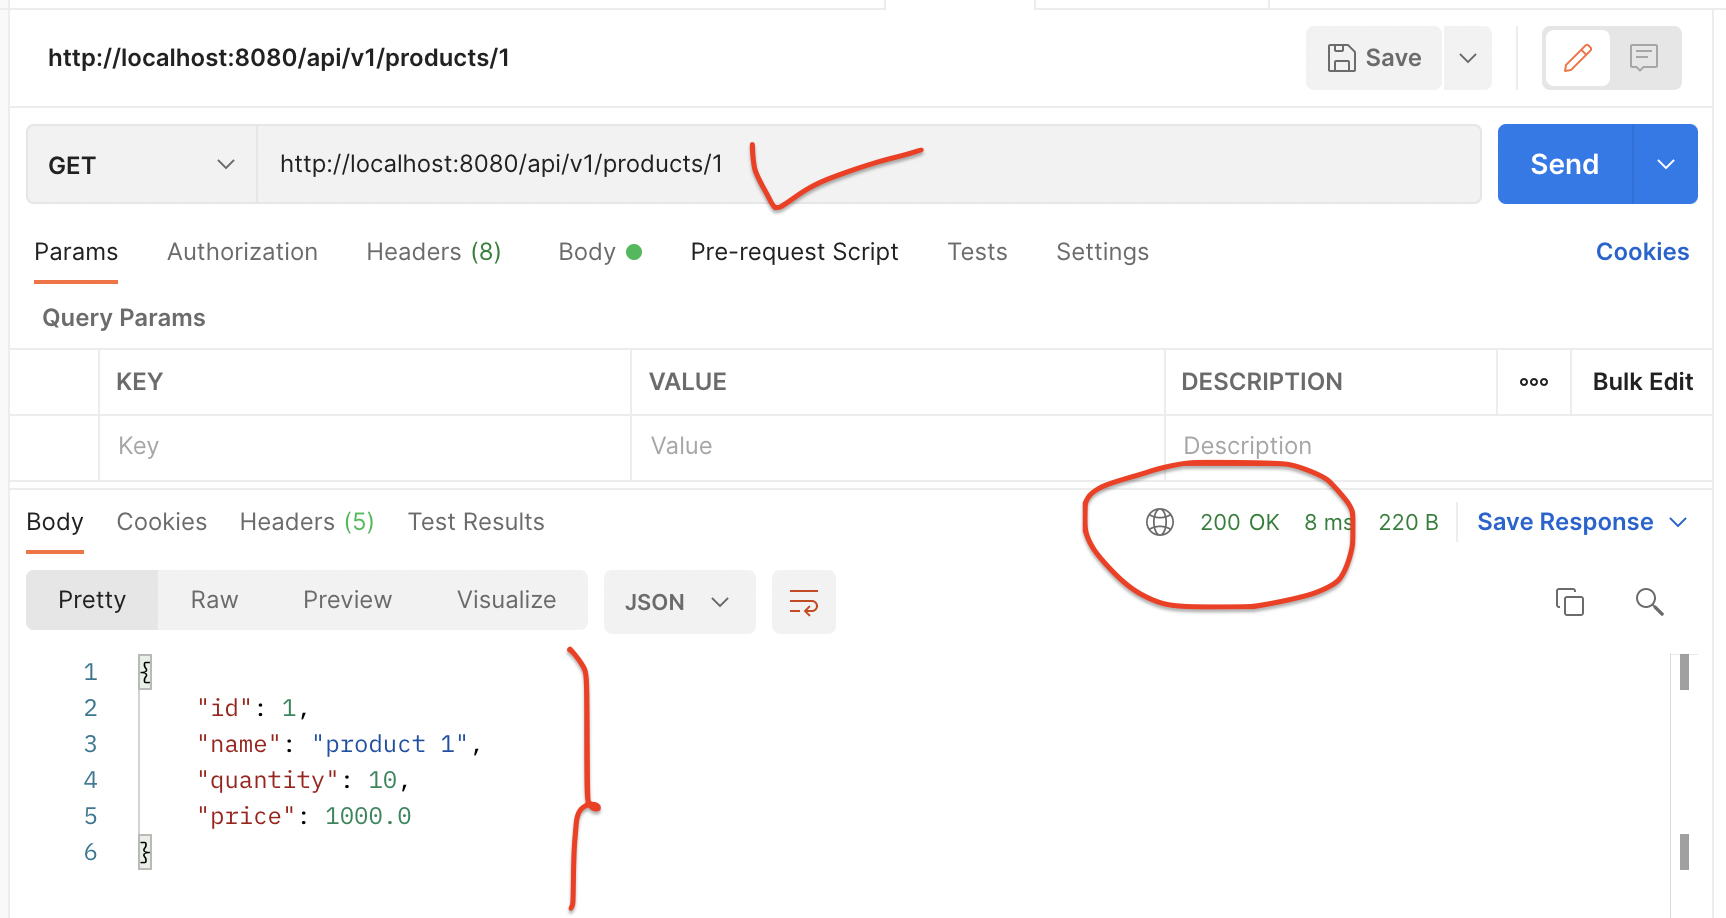
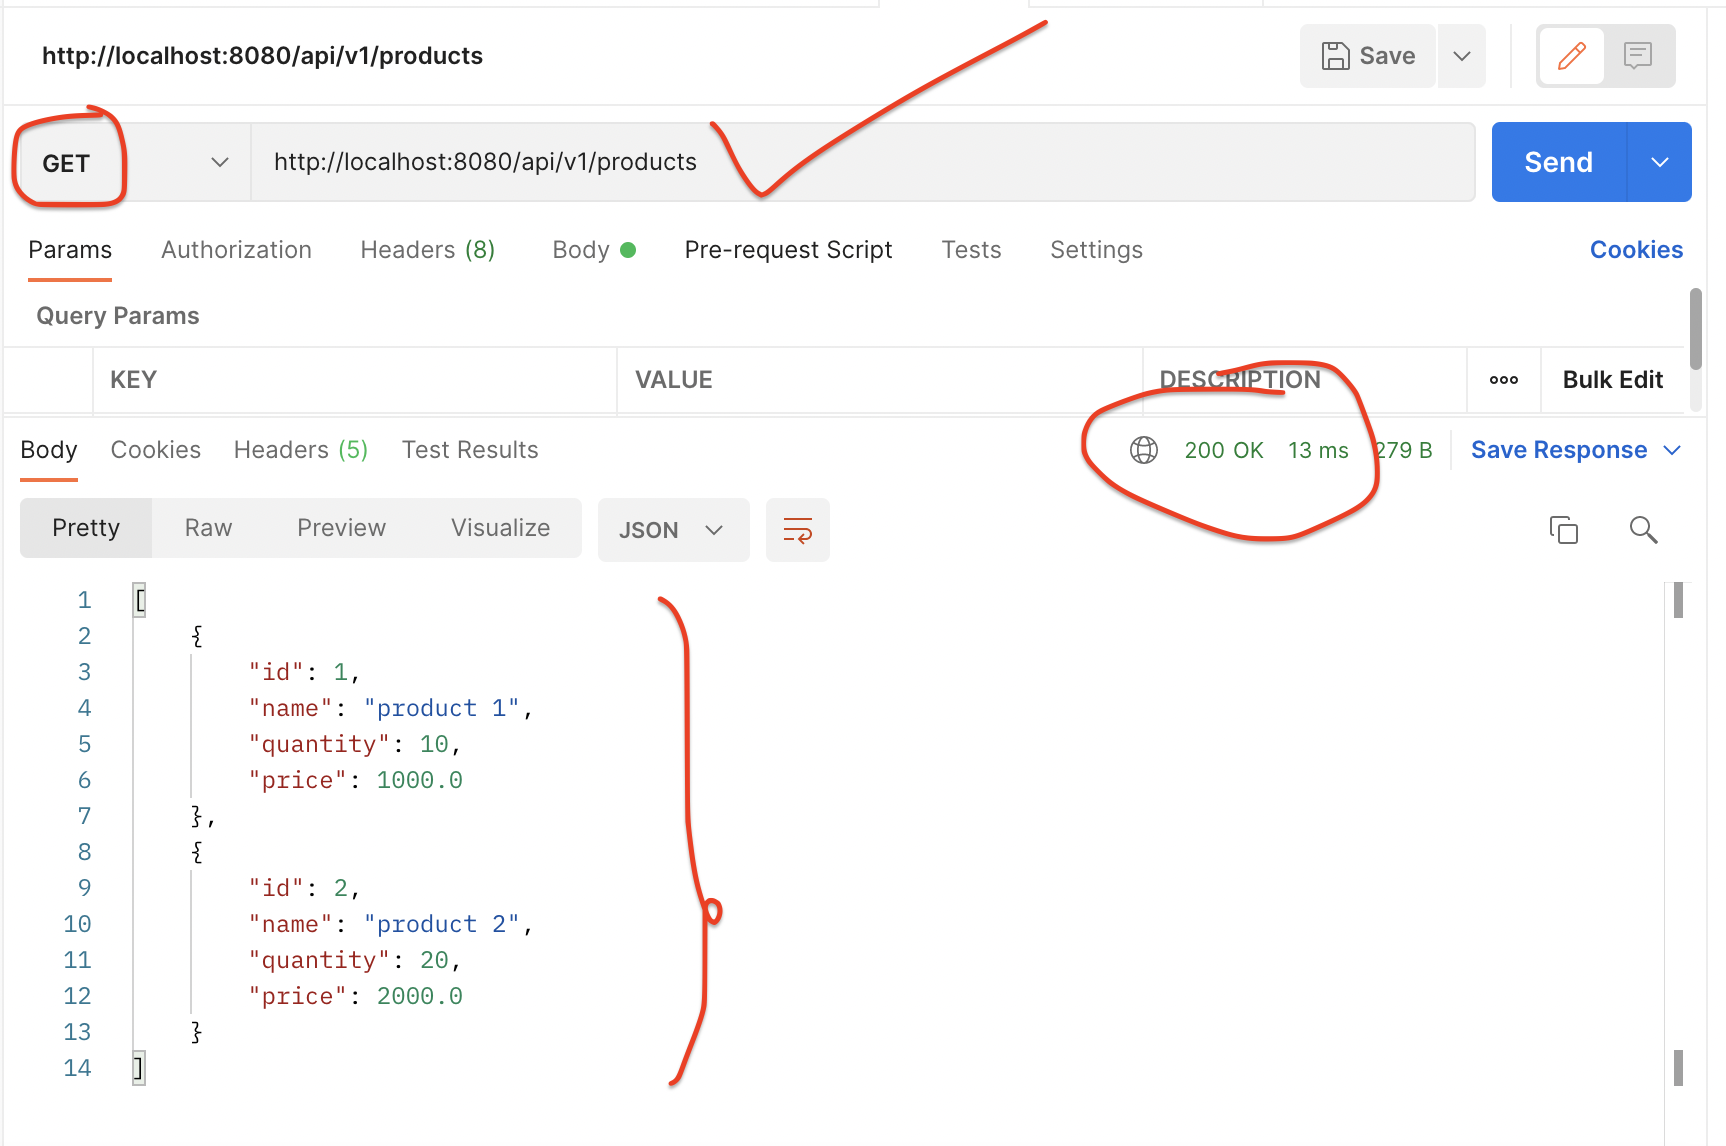
我们使用Postman客户端工具来测试CRUD REST API。
创建产品REST API:

按ID获取产品REST API:

获取所有产品REST API:

更新产品REST API:

删除产品REST API:

10.结论
在本教程中,我们看到了如何使用Spring引导构建CRUD REST API,但不使用数据库。基本上,我们使用了内存中的对象来存储和检索数据。
版权说明 : 本文为转载文章, 版权归原作者所有 版权申明
原文链接 : https://www.javaguides.net/2022/06/spring-boot-crud-example-without-database.html
内容来源于网络,如有侵权,请联系作者删除!